
Can’t get to the gym but fancy a quick work out at home? Well the mio team have put together a resistance band exercise routine for you so you’ll be able to get in a quick workout at home, in the park or even on holidays.
Resistance band training is fantastic because the resistance in the band adds some extra muscle strengthening intensity to your workouts and is great at lengthening and toning your muscles too!
Resistance band tips & tricks:
Before we show you our exercises, here are a few tips and tricks to ensure that you get the most out of your resistance band exercises!
Ensure that you keep your core engaged at all times. What does this mean? It means that you are drawing your belly button back into your spine. It might not look like you are doing much but it will ensure that your back isn’t put under pressure and your other muscles are working hard to perform the exercise correctly!
If the exercises are too easy (go wonder woman!), then shorten the resistance band as this will increase the difficulty of the exercise.
If the exercises are too hard that’s okay too! You’re on the right track! Instead of fully straightening your arms or legs, just go as far as you can go without straining yourself. Keep at it and after a few weeks you should hopefully get stronger and you can work your way up to the full position!
Exercise 1: Shoulder press (x10)
1. Place the resistance band securely under your feet.
2. Hold the handles of the resistance band at a 90 degree angle with your palms facing downwards.
3. Slowly press your hands to the ceiling keeping your back straight and core engaged.
4. Slowly release your arms back 90 degrees (starting position).
Exercise 2: Lunge with bicep curl (10 x each leg)
1. Stand in a wide stance with your left foot is flat on the floor in front or your and your right foot is behind you with your heel raise.
2. Place the exercise band under your left foot and hold the exercise band so the palms of your hands are facing the ceiling.
3. Bend your right leg down to the floor into a lunge and curl your arms towards your chest to perform a bicep curl. Remember to keep your back straight!
4. Slowly push your right upwards so it is straight again and lower your arms in front of you (starting position).
5. Repeat on the alternate leg.
Exercise 3: Overhead tricep extensions (x10)
1. Stand with your feet hip width apart and place the resistance band securely under your feet.
2. Bend your arms at a 90 degree angle and hold onto the resistance band so your palms are facing in towards each other.
3. Without arching your back, push your palms towards the ceiling so they are above your head.
4. Slowly lower your arms back to a 90 degree angle.
Exercise 4: Tricep backward rows (x10)
1. Stand with your feet hip width apart and place the resistance band securely under your feet.
2. Bend your torso to a 45 degree angle while still keeping your knees directly over your feet.
3. Hold the resistance band in a bent row position (arms at 90 degrees in front of you) with your palms facing in towards each other.
4. Slowly push your arms backwards until they are straight.
5. Bring your arms back to the starting position.
Exercise 5: Squats (x10)
1. Stand in a wide stance and place the resistance band securely under your feet.
2. Firmly hold the resistance band with your palms facing the floor.
3. Slowly bend your legs into a squat position and curl your arms up to your shoulders (the resistance band should stay behind your knees, not in front of them).
4. Press back into your heels as you straighten your legs whilst lowering your arms back to starting position.
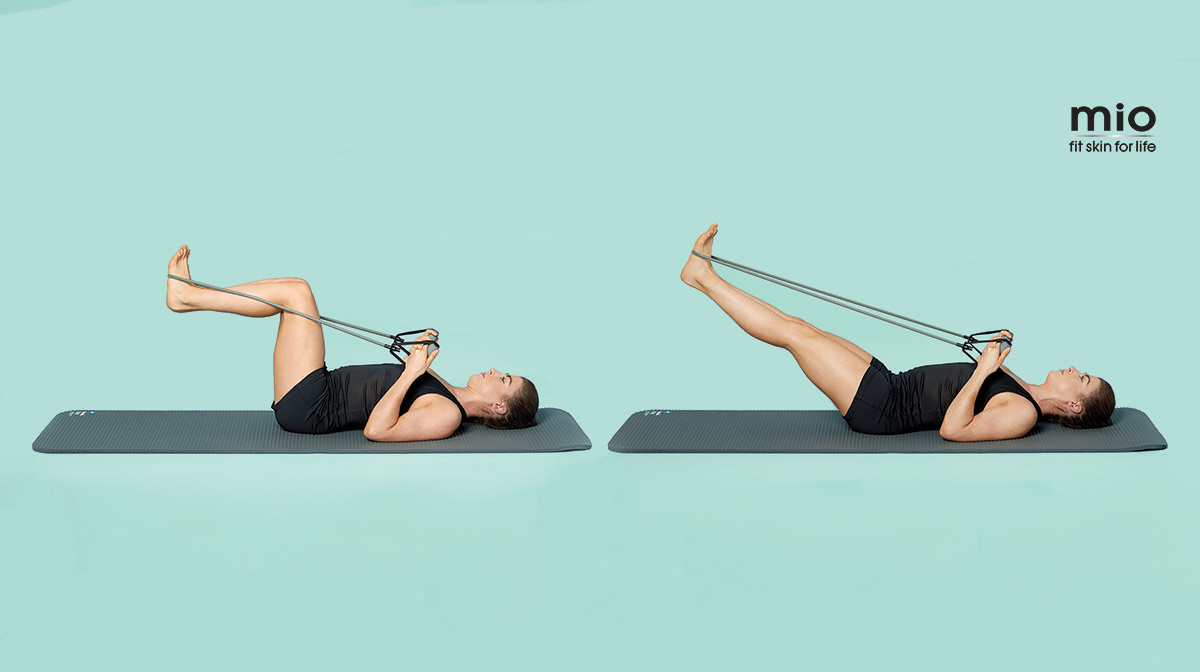
Exercise 6: Lower ab press (x10)
1. Lay down on the floor with your back firmly touching the mat and your core engaged.
2. Raise your legs up into a 90-degree angle with the resistance band behind your feet. Hold the resistance band handles.
3. Slowly push your legs out to a 90-degree angle and then release them back to a 45-degree angle.
Exercise 7: Quadriceps (x10)
1. Lay down onto the floor with your back firmly touching the mat.
2. Put the resistance band behind your feet with your legs out in front of you and firmly hold onto the handles.
3. Raise your legs to a 45-degree angle and push your feet apart (just slightly further than hip-width).
4. Slowly bring your feet back together again at a 45-degree angle.
Note: A variety of exercises can be performed using Mio Resistance Bands. Please ensure the resistance band is secure to your feet and your hands when you undertake any exercises with the Resistance band.
Always inspect your bands carefully before use for any tears, wear or damage. Mio Resistance Bands (like any rubber band) will eventually wear or break over time. Do not use a damaged or worn band, and do not use them for something that they are not intended for. Please seek the advice of a fitness expert before using the Mio Resistance Band and for correct usage.
Insta: @mioskincare //Twitter: mioskincare// Facebook: mio skincare